Posts

Showing posts from 2016

Disk Quota Management

Image
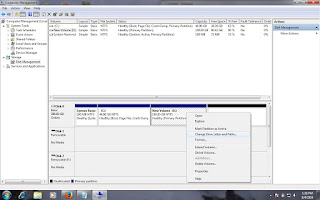
This feature use Disk limit for other user. Note :- Only use for Standard User. Step - 1  Open My Computer. Step - 2  Select Volume. Step - 3  Right Click On Volume. Step - 4  Click On Properties. Step - 5  Select Quota. Step - 6  Click Show Quota Settings. Step - 7  Click                Enable quota management.                Deny disk space to users                   exceeding quota limit.                           Step - 8  Click Limit disk space to                 Give value -  20 GB                Step - 9  Click Quota Entries... Step -10  Click Quota Step - 11 Click New Quota Entry... Step - 12  Click Advanced...  Step - 13  Click Find Now Step - 14  Select  User  Step - 15  Click ok. Step - 16  Click ok. Step - 17  Click Apply  ok.      Login User 

Parental Controls

Image
This feature use for block user, game etc. Note : Only use for Standard user.              user must password protected. Step - 1  Go to Control panel. Step - 2  Click on Parental Controls. Step - 3  Click User. Step - 4  Click On.                Show Windows Settings.

Set Password Policy.

Image
Step - 1  Go to Control Panel. Step - 2  Open Administrative tools. Step - 3  Open Local Security Policy. Step - 4  Click Account Policies. Step - 5  Open Password Policy.          (6 Type Of Policy).     1. Enforce password history              This security setting determines the number of unique new passwords that have to be associated with a user account before an old password can be reused. The value must be between 0 and 24 passwords. This policy enables administrators to enhance security by ensuring that old passwords are not reused continually.     2. Maximum password age              This security setting determines the period of time (in days) that a password can be used before the system requires the user to change it. You can set passwords to expire after a number of days between 1 and 999, or you can specify that passwords never expire by setting the number of days to 0.          3. Minimum password age              This security setting determines the period of time (

Show All Information P.C.

Image
Step - 1  Press Window Key + R. Step - 2  Type msinfo32.       Step - 3  Click ok.  Show System Information

Basic commands windows 7

Image
Step 1 Open cmd. C:\Windows\system32> Time  -  show time/change Date   -  shoe date/change Systeminfo - show all p.c. information Dir  -  show all file & folder Md folder name  -  create folder Rd folder name - delete folder Copy con filename.txt  -  create file Type filename.txt  -  show file Call filename.txt  -  open file Del filename.txt  -  delete file Cd foldername  -  change folder Cd ..  -  exit from folder Color L  -  change color Cls  -  clear screen D: -  change Drive E: -  change drive E

Block Web Site In Your Computer.

Image
Step-1  Open My Computer. Step-2  Open System Drive (c:). Step-3  Open Windows Folder. Step-4  Open System32 Folder. Step-5  Open Etc Folder. Step-6  Open hosts file in notepad.                             End of the page and type    127.0.0.1     www.facebook.com                              (site name) Step-7  Save File.

Remove all Shortcut Virus.

Image
Step-1  Click Start Button. Step-2  Search Cmd. Step-3  Right Click on Cmd. Step-4  Click on Run as administrator. Step-5  Write d: ( d: Drive letter ). Step-6  Write Del *.ink Step-7  Write attrib  -s -r -h *.* /s /d /l

Create User With command.

Image
Step-1  Log in Administrator User. Step-2  Click Start Button. Step-3  Search Cmd. Step-4  Right Click on Cmd. Step-5  Click on Run as Administrator. Step-6  Write. C:\Windows\system32>net user username /add (like net user patel /add) C:\Windows\system32>net user username * (allow password). Step-7  Press Window key + L. Step-8  Click Switch User. Step-9  Log in New user.

Creating a New Windows Firewall Rule.

Image
Step-1  Click Start. Step-2  Click Control Panel. Step-3  Search and Open Firewall. Step-4  Click Advances Setting. Step-5  Click on Inbound Rules. Step-6  Click New Rule.. Step-7  Create new rule. Step-8  Click Finish ..

Adding New Programs in Windows Firewall.

Image
Step-1  Go to Control Panel. Step-2  Search And Open Windows               Firewall. Step-3  Click on Allow a programe                or feature through Windows                firewall. Step-4  Click on Allow another                program... Step-5  Browse.. to add a program. Step-6  Click on add. Step-7  Click on ok.

Configuring Window Firewall.

Image
Step-1  Press Window Key + R. Step-2  Write Control Panel. Step-3  Click ok. Step-4  Search Windows Firewall  Step-5  Click on Turn Windows                      Firewall o n or off (Left panel). Step-6  Click on Turn on Windows               Firewall (Home). Step-7  Click on Turn on Windows                Firewall (Public). Step-8  Click on ok. 

Convert Pendrive Without Loss Data.

Image
Step-1  Click on Start Button. Step-2  Search Cmd. Step-3  Right Click on Cmd. Step-4  Click on Run as administrator. Step-5  Click Yes. Step-6  Write Convert h: /fs: ntfs                           Note - h: Drive Letter

Disable Start up Menu in Window 7.

Image
  Step-1    Right Click on the Taskbar. Step-2    Click on Properties. Step-3    Click on Start Menu. Step-4    Uncheck                   Store and display recently opened programs in the Start menu.                        Store and display recently opened item in the Start menu and the taskbar. Step-5    Click Apply. Step-6    Click ok.

Delete Partition.

Image
Method - 1 Step-1  Window Key + R (Open Run Box) Step-2  Write diskpart. Step-3  Write Select disk 0 or 1. Step-4  Write list volume. Step-5  Write select volume 3 or 4                               ( Partition number). Step-6  Write delete partition . Method - 2 Step-1  Right click on My Computer. Step-2  Click Manage. Step-3  Click Disk Management. Step-4  Select Partition. Step-5  Right Click on Partition. Step-6  Click Delete Volume....

Create Partition With Command.

Step-1    Window Key + R (Open Run Box). Step-2    Write Diskpart. Step-3    Click on Yes. Step-4    Write  list disk. Step-5    Write  select disk 1. Step-6    Write  create partition primary size=1024 (1024 Size in MB). Step-7    Write  assign letter = g Step-8    Write  format fs=ntfs quick. Step-9    Write  exit. Published  By : MANAN PATEL mananpatel487@gmail.com

Create New Partition in Window 7.

Image
Step-1    Right Click on My Computer. Step-2    Click on Manage. Step-3    Click on Disk Management Step-4    Right Click on Unallocated Space. Step-5    Click New Simple Volume. Step-6    Click on Next. Step-7    Write Volume Size in MB. Step-8    Click on Next. Step-9    Click on Next. Step-10    Click on Next. Step-11    Click on Finish.

Hide Single Drive Partition.

Image
This Step is hide disk partition. Step-1    Right Click on My Computer. Step-2    Click Manage. Step-3    Click on Disk Management. Step-4    Select Disk . Step-5    Right Click on Disk. Step-6    Click Change Drive Letter And Paths.... Step-7    Click on Remove. Step-8    Click Yes.   Hidden partition to return. Step-1    Right Click on My Computer. Step-2    Click Manage. Step-3    Click on Disk Management. Step-4    Select Disk. Step-5    Right Click on Disk. Step-6    Click Change Drive Letter And Paths.... Step-7    Click on Add. Step-8    Click on Ok. ( Show Partition on Your Computer )

Pendrive Hidden.

Step-1    Window Key  +  R (Open Run Box). Step-2    Write  regedit. Step-3    Click  Ok. Step-4    Click  Yes. Step-5    Double Click  HKAY_LOCAL_MACHINE. Step-6    Double Click  SYSTEM. Step-7    Double Click  CurrentControlSet. Step-8    Double  Click  Services. Step-9    Click  USBSTOR. Step-10   Double Click on Start. Step-11   Change Value data : 4.

Create Folder Without Name.

Image
Method - 1 Step-1  Create New Folder                 (ctrl+ shift+n). Step-2  Press alt + 255 . Method - 2 Step-1  Create New Folder (ctrl+ shift+n). Step-2  Right Click on New Folder. Step-3  Click Rename. Step-4  Right Click Name Box. Step-5  Click insert Unicode control                       character. Step-6  Click on LRM (left-to-right mark).

Hidden All Drive Your Computer.

Image
Step-1    Press Window key + R  (open Run Box). Step-2    Write gpedit.msc. Step-3    Click Ok. Step-4    Dual Click on user Configuration. Step-5    Dual Click on Administrative Templates. Step-6    Dual Click on Windows Components. Step-7    Dual Click on Windows Explorer. Step-8    Dual Click on Hide these specified drives in My Computer. Step-9    Click on Enabled. Step-10    Click on Apply. Step-11    Click on ok .                                            (Show Computer)

Remove Pendrive/Fleshdrive Shortcut Virus.

Image
Step-1 Click Start Button Step-2 Search CMD Step-3 Right Click on CMD and Run as                                                                    administrator            Step-4  Write attrib  -h  -r  -s  /s  /d  g:\*.*          Note - g: drive name

Change Background Image for Logon Screen.

Image
Step-1    Press Windows key + R (open Run Box). Step-2    Type Regedit. step-3     Click 0k. Step-4    Click Yes. Step-5    Dual Click HKEY_LOCAL_MACHINE. Step-6    Dual Click SOFTWARE. Step-7    Dual Click Microsoft. Step-8    Dual Click Windows. Step-9    Dual Click CurrentVersion. Step-10  Dual Click Authentication. Step-11  Dual Click LogonUI. Step-12  Click Background. Step-13   Dual Click OEMBackground. Step-14    Type 1 (Value Data). Step-15    Open My Computer. Step-16    Open Disk (C:). Step-17    Open Windows Folder. Step-18    Open System32 Folder. Step-19    Open oobe Folder. Step-20    Open Info Folder. Step-21    Create New Folder (Folder Name backgrounds). Step-22    Paste Image (Image Name backgrounddefault).      Note : Image size 256KB.                                               Show Lock Screen

Pen Drive Format With Command.

Image
Step-1  Press Windows key + R (Open Run Box). Step-2  Write Diskpart. Step-3  Write  List  Disk. Step-4  Write  Select disk 1 or 2. Step-5  Write  clean. Step-6  Write  Create Partition Primary. Step-7  Write  active. Step-8  Write  Format  fs=ntfs or fat32 quick.                            " Thanks "  Public By : MANAN  PATEL  mananpatel487@gmail.com

How to Password Break Windows 7

Image
Step-1   Insert Window 7 Setup DVD. Step-2   Press Boot Key (Like F7,F8,F9,F10,F12). Step-3   Select DVD Drive. Step-4   Press Any Key To Boot From DVD..... (Press Any Key). Step-5   Click Next. Step-6   Click Repair. Step-7   Click Load Drive. Step-8   Click on My computer. Step-9   Click on ( Which Partition In Windows File "like C:,E:" ). Step-10  Open Windows Folder. Step-11  Open System32 Folder. Step-12  Search "Sethc" and "Rename File" (Name manan). Step-13  Search "cmd" and "Rename File" (Name Sethc). Step-14  Click ok. Step-15  All Programs Are Closed. Step-16  Restart Your P.C. Step-17  Show Locked Screen. Step-18  Press 5 Time "Shift". Step-19  Write   net  user  username  *  ( like net  user  manan  *). Step-20  Write New Password.  

How To Install Windows 10 In Your P.C.

Image
Step-1     Insert Window 10 Setup DVD.   Step-2     Press Boot Key (Like F7,F8,F9,F10,F12). Step-3     Select CD/DVD Drive. Step-4     Press Any Key To Boot From DVD..... (Press Any Key). Step-5    Click Next. Step-6    Click Install Windows (Install Now).                  Setup is Starting. Step-7    Select The Windows Activated Operating System You Want To Install.                    (Click Windows 10 Pro   X86                                             or                                                Windows 10 pro   X64) Step-8    Click Next. Step-9    Select (I agree to install windows activated). Step-10  Click Next. Step-11  Click Custom: Install Windows Only (advanced). Step-12  Select Partition.              (.) You Can Format Your Hard disk Partition                            - Click Drive Options(Advanced)                            - Click Format                - Click Ok Step-13  Click Next   (Installing Windows Automatica

Show Icons In Your Desktop

Image
You Install Window First Time After Show Icons In Your Desktop - Right Click on Desktop. - Click on Personalization Option. - Click on Change Desktop Icons Option. - Click on.        Computer ,         Recycle Bin ,         Control Panel ,        Network ,   - Click on Apply. -  Click on Ok.                       Show Icon In Your Desktop                                                                                                              Thanks

How To Install Windows7 In Your P.C.

Image
 HOW TO INSTALL WINDOWS 7 EASILY . Step-1 Insert Window 7 Setup DVD.  Step-2 Press Boot Key (Like F7,F8,F9,F10,F12). Step-3 Select CD/DVD Drive. Step-4 Press Any Key To Boot From DVD..... (Press Any Key). Step-5 Click Next. Step-6 Click Install Windows (Install Now). Step-7 Select The Windows Activated Operating System You Want To Install.          (Click Windows 7 Ultimate  X86                          or                             Windows 7 Ultimate  X64) Step-8 Click Next. Step-9 Select (I agree to install windows activated). Step-10 Click Next. Step-11 Click Custom(advanced). Step-12 Select Partition.                 (.) You Can Format Your Hard disk Partition                                             - Click Drive Options(Advanced)                                             - Click Format                                 - Click Ok Step-13 Click Next   (Installing Windows Automatically.......) 0% to 100%. . Step-14 Complete 100% An